Wednesday, March 30, 2016

Eaves And Fascia Board: How (Not) To Fix Them

Eaves are a vulnerable part of your house, exposed to weather and damage by falling limbs.  Luckily, they aren't too hard to repair when the inevitable happens and repair is needed.  So, if your eaves are wooden, and you have some damage to your fascia board to deal with and if not why are you reading this? 

Fascia? That's the name for the vertical board or panel on the front of your eaves.  It's complement is the "soffit"- the board that forms the bottom of the structure.

The first thing is getting to the eaves, which means using a ladder.  That's the dangerous part, especially if the ground where you need to work is uneven or sloping.  It's important to find or create an even, level surface for the ladder.

Once you are up there, you need to remove the damaged part of the board.  In this case it was easy because the damaged section of board was already short.  But if you have damage to a long section of fascia board, you may choose to replace just the damaged portion.  That's not easy because the need to protect the roof deck of itself makes it hard to make a complete cut across the fascia board.  A reciprocating saw, sometimes referred to as a "Sawzall" is probably your best option.

Once the damaged board is removed, you are ready to begin fabricating the replacement pieces.  Often that will just mean the main fascia board itself.  The common board in use for this purpose in North America is a 1x6.

If you're replacing a corner piece, the easiest way to measure the angle you need is to use the old board as a template.  You can do this even if the old board doesn't have a clean, complete edge due to the damage suffered.  Just use a straightedge to create the straight line you need, as shown below.  

Once the board is cut to fit, paint it.  I believe in painting both faves of the board to better protect it from moisture and insects, though contractors will usually just paint the outside.

The next step is to replace the fillet.  You can use a cardboard template or pattern to fill the space.  I actually drew directly on the scrap piece of plywood used for the repair.  Paint the piece as you did for the fascia board, and then install it.  

Seal joints with a paintable sealant, both for a smooth finish appearance and to keep moisture out.  I used a good quality latex product.  


You can read similar articles online at www.echomeinspection.com/our-blog.html

Sunday, March 27, 2016

Advantages Of Solar Energy

Solar energy offers considerable advantages over conventional energy systems by nullifying flaws in those systems long considered to be unchangeable. Solar power for home energy production has its flaws, too, which are outlined in another article, but they're dwarfed by the advantages listed below.
 
Solar energy is a great choice
The following are advantages of solar energy:
  • Raw materials are renewable and unlimited. The amount of available solar energy is staggering -- roughly 10,000 times that currently required by humans -- and it’s constantly replaced. A mere 0.02% of incoming sunlight, if captured correctly, would be sufficient to replace every other fuel source currently used.
Granted, the Earth does need much of this solar energy to drive its weather, so let’s look only at the unused portion of sunlight that is reflected back into space, known as the albedo. Earth’s average albedo is around 30%, meaning that roughly 52 petawatts of energy is reflected by the Earth and lost into space every year. Compare this number with global energy-consumption statistics.  Annually, the energy lost to space is the combined equivalent of 400 hurricanes, 1 million Hoover Dams, Great Britain's energy requirement for 250,000 years, worldwide oil, gas and coal production for 387 years, 75 million cars, and 50 million 747s running perpetually for one year (not to mention 1 million fictional DeLorean time machines!). 
  • Solar power is low-emission. Solar panels produce no pollution, although they impose environmental costs through manufacture and construction. These environmental tolls are negligible, however, when compared with the damage inflicted by conventional energy sources:  the burning of fossil fuels releases roughly 21.3 billion metric tons of carbon dioxide into the atmosphere annually. 
  • Solar power is suitable for remote areas that are not connected to energy grids. It may come as a surprise to city-dwellers but, according to Home Power Magazine, as of 2006, 180,000 houses in the United States were off-grid, and that figure is likely considerably higher today. California, Colorado, Maine, Oregon, Vermont and Washington have long been refuges for such energy rebels, though people live off the grid in every state. While many of these people shun the grid on principle, owing to politics and environmental concerns, few of the world’s 1.8 billion off-the-gridders have any choice in the matter. Solar energy can drastically improve the quality of life for millions of people who live in the dark, especially in places such as Sub-Saharan Africa, where as many as 90% of the rural population lacks access to electricity. People in these areas must rely on fuel-based lighting, which inflicts significant social and environmental costs, from jeopardized health through Rural, off-grid homes are excellent applications for solar powercontamination of indoor air, to limited overall productivity.  
  • Solar power provides green jobs. Production of solar panels for domestic use is becoming a growing source of employment in research, manufacture, sales and installation.
  • Solar panels contain no moving parts and thus produce no noise. Wind turbines, by contrast, require noisy gearboxes and blades.
  • In the long run, solar power is economical. Solar panels and installation involve high initial expenses, but this cost is soon offset by savings on energy bills.  Eventually, they may even produce a profit on their use.
  • Solar power takes advantage of net metering, which is the practice of crediting homeowners for electricity they produce and return to the power grid. As part of the Energy Policy Act of 2005, public electric utilities are required to make available, upon request, net metering to their Manhattan, and much of the northeast USA, goes dark in August, 2003customers. This practice offers an advantage for homeowners who use solar panels (or wind turbines or fuel cells) that may, at times, produce more energy than their homes require. If net metering is not an option, excess energy may be stored in batteries.
  • Solar power can mean government tax credits. U.S. federal subsidies credit up to 30% of system costs, and each state offers its own incentives. California, blessed with abundant sunshine and plagued by high electric rates and an over-taxed grid, was the first state to offer generous renewable-energy incentives for homes and businesses.
  • Solar power is reliable. Many homeowners favor solar energy because it is virtually immune to potential failings of utility companies, mainly in the form of political or economic turmoil, terrorism, natural disasters, or brownouts due to overuse. The Northeast Blackout of 2003 unplugged 55 million people across two countries, while rolling blackouts are a part of regular life in some South Asian countries, and occasionally in California and Texas.
  • Solar power conserves foreign energy expenditures. In many countries, a large percentage of earnings is used to pay for imported oil for power generation. The United States alone spends $13 million per hour on oil, much of which comes from Persian Gulf nations. As oil supplies dwindle and prices rise in this politically unstable region, these problems continue to catalyze the expansion of solar power and other alternative-energy systems.
In summary, solar energy offers advantages to conventional fossil fuels and other renewable energy systems.


You can read similar articles online at www.echomeinspection.com/our-blog.html


Inspecting An Adobe Style Home

Adobe is a natural building material made from clay and sand mixed with water and an organic binder, such as sticks, straw or dung. Adobe structures are more common in inhospitable climates and where lumber is scarce.  They're commonly built in low-income communities that lack the resources to construct more complex or conventional designs whose components are more costly. InterNACHI inspectors should be prepared to find adobe buildings in all types of communities -- even wealthy ones -- as green building advocates and experimental builders have become more attracted to adobe construction in recent years.
 
The History of Adobe
 
Due to the abundance of its constituents and ease by which it is produced and shaped, adobe construction is truly ancient and universal. Even the word “adobe” has existed for around 4,000 years, with little change in its pronunciation or meaning; it can be traced from the Middle Egyptian word for “mud brick” and was borrowed by Late Egyptian, Demotic, Coptic, Arabic, Old Spanish and, finally, English. San Miguel Mission in Santa Fe, New MexicoEntire cities have been made from the material and many adobe buildings have seen continuous use for thousands of years. Even within the United States, many of the oldest buildings, indigenous and European, were made from adobe. Two such examples are the San Miguel Mission of Santa Fe, New Mexico, thought to be the oldest church in the country, and Pueblo towns and villages that have withstood the winds of the American West since 750 AD. Today, the use of adobe is still widespread across the American Southwest, North Africa, West Africa, western Asia, South America and southern Europe.
Perhaps not surprisingly, adobe is an ideal building material for the climates in which it is most commonly found, such as deserts and other regions typified by hot days and cool nights. The material’s great thermal mass cannot transfer heat without a relatively long input of sun exposure, keeping the interior cool during the daytime when the sun burns intensely. By the time the sun sets, the thick adobe walls will have absorbed the sun’s heat, which is then slowly released into the living space when the outside temperature is at its lowest. By the time the structure has exhausted its heat reserves, the sun will rise again, starting the cycle anew.
Adobe provides excellent soundproofing and fire-resistance, which is helpful when a fire must be kept lit during cold nights. It is also easy to produce; according to Sustainable Sources, a green building journal, adobe requires less than 1/150th of the energy required to manufacture a similar amount of Portland cement, and less than five times the energy required to produce ordinary brick. 
Adobe Construction Elements
 
The following materials are commonly found in adobe construction:
  • bricks:  While adobe can simply be piled up and shaped into a structure (as did American Indians before their contact with the Spaniards and their architectural influences), it is generally cast into uniformly sized bricks before they are assembled.  A man molds adobe bricks in the traditional method.The adobe mixture, by weight, is roughly half sand, one-third clay, and one-sixth straw or some other organic, fibrous material. Modern bricks are 14 inches long, 10 inches wide and 4 inches thick. Water is used to turn the clay and sand into a more fluid, malleable consistency, and the straw helps the bricks shrink more uniformly while they dry. Visible alkali salts or brackish water should be avoided for mixing adobe.  A test brick is sometimes made to ensure the suitability of local soil. To form bricks, the wet adobe mix is poured into molds or pressure-molded using special machinery and then left to cure for weeks. Bricks are sometimes kiln-fired in low temperatures, but their use at the exterior is discouraged in climate zones with daily freeze-thaw cycles;
  • mortar:  Traditionally, mud mortar was used to lay adobe bricks, as the two have the same rates of thermal expansion. Modern adobe bricks may be laid with cement (or some other strong mortar) if the adobe bricks are stabilized during production using certain admixtures, such as asphalt, in order to limit the adobe’s water adsorption. Cement mortar will accelerate the deterioration of natural (or non-stabilized) adobe bricks, however, because the cement is stronger than the adobe;
  • foundations:  The foundations of historic adobe buildings were made from a variety of materials, including seashells, bricks, tile fragments and field stones. In more modern adobe structures, foundations may be large or non-existent.  Adobe structures were rarely constructed over basements or crawlspaces. Modern building codes prohibit the use of adobe as a foundation material due to its low structural strength;
  • walls:  To compensate for their structural weakness and to support a heavy roof, adobe walls are massive. They may account for 15% to 20% of the weight of the whole house, while frame-house walls account for about 5% of the structure’s weight. The aspect ratio, or the ratio of the height of the wall to its thickness, should not be higher than 10 or the structure will be unstable. For this reason, adobe structures are almost exclusively only one or two stories tall and used for single-family housing;
  • floors:  Floors may be flagstone, tile, fired brick or adobe brick;
  • roofs:  Older adobes of the American Southwest were typically built with flat roofs with parapet walls. Logs and wooden poles were incorporated into the roof for support. Sawn planks and boards are used in newer adobe roofs and for repairs in older adobe. Adobes built over the last hundred years in New Mexico have sheet metal for roofing;
  • bond beams:  On top of the highest layer of brick is the bond beam, which provides a horizontal bearing plate for the roof to distribute the weight more evenly along the wall. They help anchor the roof against wind loads and secure the structure against earthquakes and the gradual effects of gravity. The Universal Building Code (UBC) states:

    The wood tie beam shall be a minimum of 6 inches in thickness, except as provided for walls thicker than 10 inches above; A wooden lintel framing a window in an adobe structure
  • lintels:  Lintels are used to distribute loads over entrance ways and window openings, as well as for decoration. Concerning lintels in adobe, the UBC states:

    Lintels shall be minimum in size, 6 inches by wall thickness. All ends shall have a wall bearing of at least 12 inches. All lintels, wood or concrete, in excess of 9 feet shall have specific approval of the building official; and
  • footings and stem walls:  The footing and stem wall of adobe houses should be 24 inches and 14 inches, respectively, both of which are somewhat larger than those for frame houses whose difference is due to the greater weight of adobe walls. In colder regions, such as the mountains of New Mexico, adobe footings are dug even deeper to avoid the expansion and contraction caused by freezing cycles. 
Adobe Coatings
Adobe walls that are not stabilized require exterior coatings to protect against moisture intrusion. Even in stabilized adobe, protective coatings can retard surface deterioration caused by sand, wind and insects.
 
While inspecting adobe homes, InterNACHI inspectors may encounter the following types of coatings:
  • mud plaster:  This was typically used on historic adobe houses because it bonds easily with the brick and exhibits the same expansion under heat. The mud plaster must be smoothed manually, which can be a time-consuming process;Workers plaster a massive adobe wall.
  • whitewash:  Similar to mud plaster, whitewash includes gypsum and acts as a sealant when it’s brushed onto the adobe. It has fallen out of favor in recent years due to its impermanence and high maintenance, as it must be re-applied regularly;
  • lime plaster:  Consisting of lime, sand and water, lime plaster is stronger than mud plaster but it tends to crack easily. Walls are sometimes cut with hatchets to create grooves that encourage the lime plaster to adhere to the adobe. This style became popular during the early 20th century; or
  • stucco:  This consists of cement, sand and water and is applied with a trowel over a wire mesh nailed to the adobe surface. This material has enjoyed popularity because it requires little maintenance when applied over fired or stabilized adobe brick and because it can be easily painted. Many New Mexican structures appear to be adobe but they’re actually stucco-clad wood or concrete, as their builders use stucco to convey a historic adobe appearance. 
Adobe Buildings and Moisture Damage
Adobe structures are extremely vulnerable to the effects of moisture, which are mainly in the forms of rainfall and the local water table. Adobe will lose its structural strength as it becomes saturated, turning into putty and eventually flowing and dripping as a liquid. Rainwater splashes can cause coving, which is the hollowing-out of the wall just above grade level.  The drThis adobe walls shows the damage begun by coving.ying process after rainfall can create furrows, cracks, deep fissures and pitting. Weakened walls will bulge, deform and eventually collapse under the roof’s weight. For these reasons, the survival of adobe structures depends on keeping them free from excessive moisture. 
 
The destructive effects of moisture on adobe buildings may be substantially halted by the following remedies:
  • Slope the land adjacent to the structure so that rainwater does not pool next to its lower walls. Consider creating drainage channels, French drains or swales to direct rainwater away from the building.
  • Remove trees, plants and other vegetation from the adobe structure’s foundation and walls. Moisture can be collected by their roots beneath, next to or even on the building’s walls. Roots might also be growing into the structure and physically destroying the walls from within. See our article on Tree Dangers for more information about the problems of intrusive roots.
  • Apply hydrophobic coatings to repel water from the walls. In older structures, mud plaster, whitewash or stucco may be used to maintain the historic appearance.
  • Slope the roof. Flat roofs will allow rainwater to pool. Parapet roofs are particularly troublesome, as their high walls will allow rainwater to pool, slowly disintegrating the adobe.
  • Stabilize the bricks near ground level. Natural untreated bricks should not be used within 4 inches of ground level, where moisture intrusion is most likely.
 
Adobe Buildings and Earthquake Dangers
 
Adobe is a heavy yet relatively weak building material, which makes adobe structures particularly vulnerable to earthquakes. The typical mode of collapse is out-of-plane failure of the walls, resulting in the loss of support for the roof.
 
The scope of this danger can be seen in the devastation caused by the 2003 earthquake in Bam, Iran, where a 6.6 temblor leveled thousands of adobe homes. Along with them fell the 2,500-year-old Bam Citadel, which, at 180,000 square meters, was then the largest adobe structure in the world. Iran's Bam Citadel, which was destroyed in a 2003 earthquake
 
In seismically active Peru, one can further see how not to design earthquake-resistant adobe homes. Traditional construction techniques used there do not call for binding the four walls together, making them vulnerable to even modest seismic shifts in a country that has experienced more than 450 major earthquakes in the last century alone. One Architecture Week reporter commented, “You can see gaps at the corners and between the walls and the roof. That means that when there's an earthquake, the walls just flop outward like cards.  And the roofs, which can weigh up to 11 tons, come crashing down, crushing people to death."
 
Experimental building techniques in Peru have revealed that strips of electro-welded wire mesh may be used to "sew" the house together along the inside and outside seams of the walls, which are then covered with concrete. This adobe wall shows a severe gap where these walls (almost) join.Local materials, such as bamboo and sugar cane, have also been used successfully to strengthen houses against earthquakes. These measures do not make the structure indestructible but, rather, allow the occupants extra time to escape before the ceiling comes crashing down.
 
Building codes related to the structural reinforcement of adobe are more stringent in seismically active regions, and inspectors and adobe homeowners should learn about the earthquake dangers for their region. An engineering analysis should be performed to determine whether and what type of reinforcement may be necessary.  According to the UBC, steel reinforcement, if used in adobe, "should be embedded in a cement-based mortar and grout unless there is a positive interlacing of reinforcement around the earthen material." Misguided attempts to secure adobe walls often cause more harm than good, as steel reinforcement inserted vertically into adobe bricks can cause cracking because it prevents the new adobe from naturally shrinking. Steel will also not bond with adobe as easily as it will with fired brick or concrete.
 
Other Inspection Tips
Inspectors may notice that adobe walls are pitted, bulging or cracked, or the roof may be sagging, but the cause of these problems may not be obvious. Yet, historic and modern adobe structures share common deterioration problems, so it pays to understand the basic vulnerabilities inherent in the material.
 
Consider the following sources of adobe deterioration:
  • intrusive vegetation:  Perhaps not surprisingly, adobe tends to attract vegetation and animals that naturally live in soil. Seeds deposited by animals or blown by the wind will germinate there.  Insects, rodents and birds will find adobe walls and foundations very comfortable to nest in. Plant roots will forcefully degrade adobe bricks and retain moisture, undermining the strength of the structure. All plant and animal pests should be removed from the structure unless their removal would cause further damage;
  • sand erosion:  Wind-blown sand is a common source of adobe deterioration in desert climates. This damage is generally found at the top half of the wall and at the corners, where it can be distinguished from coving that is caused by rain splashing on the lower portion of the wall. New adobe mud may be applied where sand has damaged the walls or roof. Trees may also be planted as windbreaks, although they should be planted far enough away from the structure so that their roots do not themselves pose a threat;
  • incompatible materials:  Older adobe structures have periodically been repaired using cement or steel, which may cause the surrounding adobe to crumble. The reason for this is simple: the relatively weaker adobe material is crushed by the newer materials, which expand at different rates due to temperature changes. Watch for the presence of steel doors and wooden lintels. Latex and plastic wall coatings applied to their exterior will not expand with the rest of the structure and will eventually cause portions of the wall to break off;
  • cracks in walls, foundations and roofs:  In adobe, cracks are generally quite visible, but their causes may be difficult to diagnose. Some cracking is normal, such as the short hairline cracks that occur during the curing process as the adobe shrinks and continues to dry out. More extensive cracking, however, usually indicates serious structural problems. The UBC states:

    No units shall contain more than three shrinkage cracks, and no shrinkage crack shall exceed 2 inches in length or 1/8-inch in width; and
  • the ground is not compressed or sufficiently tamped before building:  Before assembling an adobe structure, the ground should be compressed because the weight of adobe bricks is significantly greater than a conventional frame house. Uncompressed earth may allow sinking of the structure, eventually resulting in wall cracks, among other problems.

In summary, adobe is an ancient and beautiful building material, and there are ways to prevent it from returning to the earth on which it stands.  InterNACHI inspectors, as well as green homeowners, can help avert costly mistakes and potential disasters by learning some fundamentals about its characteristics.


You can read similar articles online at www.echomeinspection.com/our-blog.html


Example Of A Garage Inspection

Above:  garage exterior
 
 
This is the exterior of a townhome I was asked to inspect. During the inspection, I ran into a neighbor who told me that the roof of another garage, identical to the one pictured above two buildings down, had collapsed the previous winter under a snow load.
So, I decided to keep my eyes wide open as I went through the garage.
 
 
Above:  trusses and truss connections
 
 
Some defects you have to search for, and some are pretty obvious. These first two defects were obvious from the doorway:
  • improper alterations; and
  • improper bearing points.
Trusses cannot be altered in any way without the approval of a structural engineer. When you see plywood gussets added at truss connections like these triangular gussets, then an alteration of some sort has obviously been made and you have to recommend evaluation by a structural engineer.  So, that condition went into the report
Trusses are designed to bear loads at very specific points. Typical roof trusses should not touch any interior walls and should bear only on the exterior walls. The two trusses at the left of the above photo are bearing on an offset portion of the garage wall.
A portion of the structural roof load was being transferred to the bottom chords of the trusses at a point at which they were not designed to support a load.
 
 
Above:  the connection
 
Then I walked over and looked more closely at the connections where the trusses attached to the wall and found these problems:
  • inadequate metal connector (hanger);
  • inadequate fasteners (deck screws); and
  • improper fastener installation (through drywall). 
These trusses would have best been supported by bearing directly on wall framing. The next best solution would be an engineer-designed ledger or engineer-specified hardware. And that may have been how they were originally built, but by the time I inspected them, 24-foot roof trusses were supported by joist hangers designed to support 2x4 joists. The hangers were fastened with four gold deck screws each.
Gold deck screws are designed to resist withdrawal. Fasteners for metal connecters such as joist hangers are designed to resist shear.
Withdrawal force is like the force which would be generated if you grabbed the head of a fastener with pliers and tried to pull it straight out.
Shear force is what’s used if you take a pair of heavy-duty wire cutters and cut the fastener. Fasteners designed to resist withdrawal, such as deck screws, are weak in shear resistance.
So, there were drastically undersized metal connectors fastened by badly under-strength fasteners.
To make matters worse, the screws were fastened through drywall, which doesn’t support the shaft of the screw and degrades the connection even further.
 
Above:  gangnail integrity destroyed
 
And, once I looked really closely, I found more truss alterations. The gangnail had been pried loose and the spikes which form the actual mechanical connection were destroyed. In their place were a couple of bent-over nails. This condition represented a terrific loss of strength and this roof, too, was a candidate for catastrophic structural failure.
 
In summary, look carefully at connections for problems which may lead to structural issues, as some are more urgent than others.  Be sure to call these out in your report.  Also, all electrical receptacles in garages must be GFCI-protected, without exception.


You can read similar articles online at www.echomeinspection.com/our-blog.html


15 Tools Every Home Owner Should Own

The following items are essential tools, but this list is by no means exhaustive. Feel free to ask an InterNACHI inspector during your next inspection about other tools that you might find useful.
 
1.  Plunger
A clogged sink or toilet is one of the most inconvenient household problems that you will face. With a plunger on hand, however, you can usually remedy these plumbing issues relatively quickly. It is best to have two plungers -- one for the sink and one for the toilet.


2.  Combination Wrench Set
One end of a combination wrench set is open and the other end is a closed loop. Nuts and bolts are manufactured in standard and metric sizes, and because both varieties are widely used, you’ll need both sets of wrenches. For the most control and leverage, always pull the wrench toward you, instead of pushing on it. Also, avoid over-tightening.

3.  Slip-Joint Pliers
Use slip-joint pliers to grab hold of a nail, a nut, a bolt, and much more. These types of pliers are versatile because of the jaws, which feature both flat and curved areas for gripping many types of objects. There is also a built-in slip-joint, which allows the user to quickly adjust the jaw size to suit most tasks.

4.  Adjustable WrenchCaulking gun
Adjustable wrenches are somewhat awkward to use and can damage a bolt or nut if they are not handled properly. However, adjustable wrenches are ideal for situations where you need two wrenches of the same size. Screw the jaws all the way closed to avoid damaging the bolt or nut.

5.  Caulking Gun
Caulking is the process of sealing up cracks and gaps in various structures and certain types of piping. Caulking can provide noise mitigation and thermal insulation, and control water penetration. Caulk should be applied only to areas that are clean and dry.
 
6.  Flashlight
None of the tools in this list is of any use if you cannot visually inspect the situation. The problem, and solution, are apparent only with a good flashlight. A traditional two-battery flashlight is usually sufficient, as larger flashlights may be too unwieldy.
 
7.  Tape Measure
Measuring house projects requires a tape measure -- not a ruler or a yardstick. Tape measures come in many lengths, although 25 feet is best.  Measure everything at least twice to ensure accuracy.
 
8.  Hacksaw
A hacksaw is useful for cutting metal objects, such as pipes, bolts and brackets. Torpedo levelHacksaws look thin and flimsy, but they’ll easily cut through even the hardest of metals. Blades are replaceable, so focus your purchase on a quality hacksaw frame.

9. Torpedo Level
Only a level can be used to determine if something, such as a shelf, appliance or picture, is correctly oriented. The torpedo-style level is unique because it not only shows when an object is perfectly horizontal or vertical, but it also has a gauge that shows when an object is at a 45-degree angle. The bubble in the viewfinder must be exactly in the middle -- not merely close.

10.  Safety Glasses / Goggles
For all tasks involving a hammer or a power tool, you should always wear safety glasses or goggles. They should also be worn while you mix chemicals.

11.  Claw Hammer
A good hammer is one of the most important tools you can own.  Use it to drive and remove nails, to pry wood loose from the house, and in combination with other tools. They come in a variety of sizes, although a 16-ounce hammer is the best all-purpose choice.

12.  Screwdriver Set
It is best to have four screwdrivers: a small and large version of both a flathead and a Phillips-head screwdriver. Electrical screwdrivers areWire cutter sometimes convenient, but they're no substitute.  Manual screwdrivers can reach into more places and they are less likely to damage the screw. 
13.  Wire Cutters
Wire cutters are pliers designed to cut wires and small nails. The side-cutting style (unlike the stronger end-cutting style) is handy, but not strong enough to cut small nails.

14.  Respirator / Safety Mask
While paints and other coatings are now manufactured to be less toxic (and lead-free) than in previous decades, most still contain dangerous chemicals, which is why you should wear a mask to avoid accidentally inhaling. A mask should also be worn when working in dusty and dirty environments. Disposable masks usually come in packs of 10 and should be thrown away after use. Full and half-face respirators can be used to prevent the inhalation of very fine particles that ordinary facemasks will not stop.
15.  Duct Tape
This tape is extremely strong and adaptable. Originally, it was widely used to make temporary repairs to many types of military equipment. Today, it’s one of the key items specified for home emergency kits because it is water-resistant and extremely sticky.
  
 You can read similar articles online at www.echomeinspection.com/our-blog.html


Original story found at https://www.nachi.org/15-tools.htm

10 Easy Ways To Save Money & Energy In Your Home

Most people don’t know how easy it is to make their homes run on less energy, and here at InterNACHI, we want to change that.
Drastic reductions in heating, cooling and electricity costs can be accomplished through very simple changes, most of which homeowners can do themselves. Of course, for homeowners who want to take advantage of the most up-to-date knowledge and systems in home energy efficiency, InterNACHI energy auditors can perform in-depth testing to find the best energy solutions for your particular home. 
Why make your home more energy efficient? Here are a few good reasons:
  • Federal, state, utility and local jurisdictions' financial incentives, such as tax breaks, are very advantageous for homeowners in most parts of the U.S.
  • It saves money. It costs less to power a home that has been converted to be more energy-efficient.
  • It increases the comfort level indoors.
  • It reduces our impact on climate change. Many scientists now believe that excessive energy consumption contributes significantly to global warming.
  • It reduces pollution. Conventional power production introduces pollutants that find their way into the air, soil and water supplies.
1. Find better ways to heat and cool your house. 
As much as half of the energy used in homes goes toward heating and cooling. The following are a few ways that energy bills can be reduced through adjustments to the heating and cooling systems:
  • Install a ceiling fan. Ceiling fans can be used in place of air conditioners, which require a large amount of energy.
  • Periodically replace air filters in air conditioners and heaters.
  • Set thermostats to an appropriate temperature. Specifically, they should be turned down at night and when no one is home. In most homes, about 2% of the heating bill will be saved for each degree that the thermostat is lowered for at least eight hours each day. Turning down the thermostat from 75° F to 70° F, for example, saves about 10% on heating costs.
  • Install a programmable thermostat. A programmable thermostat saves money by allowing heating and cooling appliances to be automatically turned down during times that no one is home and at night. Programmable thermostats contain no mercury and, in some climate zones, can save up to $150 per year in energy costs.
  • Install a wood stove or a pellet stove. These are more efficient sources of heat than furnaces.
  • At night, curtains drawn over windows will better insulate the room.
2. Install a tankless water heater.
Demand-type water heaters (tankless or instantaneous) provide hot water only as it is needed. They don't produce the standby energy losses associated with traditional storage water heaters, which will save on energy costs. Tankless water heaters heat water directly without the use of a storage tank. When a hot water tap is turned on, cold water travels through a pipe into the unit. A gas burner or an electric element heats the water. As a result, demand water heaters deliver a constant supply of hot water. You don't need to wait for a storage tank to fill up with enough hot water.
3. Replace incandescent lights.
The average household dedicates 11% of its energy budget to lighting. Traditional incandescent lights convert approximately only 10% of the energy they consume into light, while the rest becomes heat. The use of new lighting technologies, such as light-emitting diodes (LEDs) and compact fluorescent lamps (CFLs), can reduce the energy use required by lighting by 50% to 75%. Advances in lighting controls offer further energy savings by reducing the amount of time that lights are on but not being used. Here are some facts about CFLs and LEDs:
  • CFLs use 75% less energy and last about 10 times longer than traditional incandescent bulbs.
  • LEDs last even longer than CFLs and consume less energy.
  • LEDs have no moving parts and, unlike CFLs, they contain no mercury.
4. Seal and insulate your home.
Sealing and insulating your home is one of the most cost-effective ways to make a home more comfortable and energy-efficient, and you can do it yourself. A tightly sealed home can improve comfort and indoor air quality while reducing utility bills. An InterNACHI energy auditor can assess  leakage in the building envelope and recommend fixes that will dramatically increase comfort and energy savings.
The following are some common places where leakage may occur:
  • electrical receptacles/outlets;
  • mail slots;
  • around pipes and wires;
  • wall- or window-mounted air conditioners;
  • attic hatches;
  • fireplace dampers;
  • inadequate weatherstripping around doors;
  • baseboards;
  • window frames; and
  • switch plates.
Because hot air rises, air leaks are most likely to occur in the attic. Homeowners can perform a variety of repairs and maintenance to their attics that save them money on cooling and heating, such as: 
  • Plug the large holes. Locations in the attic where leakage is most likely to be the greatest are where walls meet the attic floor, behind and under attic knee walls, and in dropped-ceiling areas.
  • Seal the small holes. You can easily do this by looking for areas where the insulation is darkened. Darkened insulation is a result of dusty interior air being filtered by insulation before leaking through small holes in the building envelope. In cold weather, you may see frosty areas in the insulation caused by warm, moist air condensing and then freezing as it hits the cold attic air. In warmer weather, you’ll find water staining in these same areas. Use expanding foam or caulk to seal the openings around plumbing vent pipes and electrical wires. Cover the areas with insulation after the caulk is dry.
  • Seal up the attic access panel with weatherstripping. You can cut a piece of fiberglass or rigid foamboard insulation in the same size as the attic hatch and glue it to the back of the attic access panel. If you have pull-down attic stairs or an attic door, these should be sealed in a similar manner.
5. Install efficient showerheads and toilets.
The following systems can be installed to conserve water usage in homes:
  • low-flow showerheads. They are available in different flow rates, and some have a pause button which shuts off the water while the bather lathers up;
  • low-flow toilets. Toilets consume 30% to 40% of the total water used in homes, making them the biggest water users. Replacing an older 3.5-gallon toilet with a modern, low-flow 1.6-gallon toilet can reduce usage an average of 2 gallons-per-flush (GPF), saving 12,000 gallons of water per year. Low-flow toilets usually have "1.6 GPF" marked on the bowl behind the seat or inside the tank;
  • vacuum-assist toilets. This type of toilet has a vacuum chamber that uses a siphon action to suck air from the trap beneath the bowl, allowing it to quickly fill with water to clear waste. Vacuum-assist toilets are relatively quiet; and
  • dual-flush toilets. Dual-flush toilets have been used in Europe and Australia for years and are now gaining in popularity in the U.S. Dual-flush toilets let you choose between a 1-gallon (or less) flush for liquid waste, and a 1.6-gallon flush for solid waste. Dual-flush 1.6-GPF toilets reduce water consumption by an additional 30%.
6. Use appliances and electronics responsibly.
Appliances and electronics account for about 20% of household energy bills in a typical U.S. home. The following are tips that will reduce the required energy of electronics and appliances:
  • Refrigerators and freezers should not be located near the stove, dishwasher or heat vents, or exposed to direct sunlight. Exposure to warm areas will force them to use more energy to remain cool.  
  • Computers should be shut off when not in use. If unattended computers must be left on, their monitors should be shut off. According to some studies, computers account for approximately 3% of all energy consumption in the United States.
  • Use efficient ENERGY STAR-rated appliances and electronics. These devices, approved by the U.S. Department of Energy and the Environmental Protection Agency’s ENERGY STAR Program, include TVs, home theater systems, DVD players, CD players, receivers, speakers, and more. According to the EPA, if just 10% of homes used energy-efficient appliances, it would reduce carbon emissions by the equivalent of 1.7 million acres of trees.
  • Chargers, such as those used for laptops and cell phones, consume energy when they are plugged in. When they are not connected to electronics, chargers should be unplugged.
  • Laptop computers consume considerably less electricity than desktop computers.
7. Install daylighting as an alternative to electrical lighting.
Daylighting is the practice of using natural light to illuminate the home's interior. It can be achieved using the following approaches:
  • skylights. It’s important that they be double-pane or they may not be cost-effective. Flashing skylights correctly is key to avoiding leaks;
  • light shelves. Light shelves are passive devices designed to bounce light deep into a building. They may be interior or exterior. Light shelves can introduce light into a space up to 2½ times the distance from the floor to the top of the window, and advanced light shelves may introduce four times that amount;
  • clerestory windows.  Clerestory windows are short, wide windows set high on the wall. Protected from the summer sun by the roof overhang, they allow winter sun to shine through for natural lighting and warmth; and 
  • light tubes.  Light tubes use a special lens designed to amplify low-level light and reduce light intensity from the midday sun. Sunlight is channeled through a tube coated with a highly reflective material, and then enters the living space through a diffuser designed to distribute light evenly.
8. Insulate windows and doors.
About one-third of the home's total heat loss usually occurs through windows and doors. The following are ways to reduce energy lost through windows and doors:
  • Seal all window edges and cracks with rope caulk. This is the cheapest and simplest option.
  • Windows can be weatherstripped with a special lining that is inserted between the window and the frame. For doors, apply weatherstripping around the whole perimeter to ensure a tight seal when they're closed. Install quality door sweeps on the bottom of the doors, if they aren't already in place.
  • Install storm windows at windows with only single panes. A removable glass frame can be installed over an existing window.
  • If existing windows have rotted or damaged wood, cracked glass, missing putty, poorly fitting sashes, or locks that don't work, they should be repaired or replaced.
9. Cook smart.
An enormous amount of energy is wasted while cooking. The following recommendations and statistics illustrate less wasteful ways of cooking:
  • Convection ovens are more efficient that conventional ovens. They use fans to force hot air to circulate more evenly, thereby allowing food to be cooked at a lower temperature. Convection ovens use approximately 20% less electricity than conventional ovens.
  • Microwave ovens consume approximately 80% less energy than conventional ovens.
  • Pans should be placed on the matching size heating element or flame. 
  • Using lids on pots and pans will heat food more quickly than cooking in uncovered pots and pans.
  • Pressure cookers reduce cooking time dramatically.
  • When using conventional ovens, food should be placed on the top rack. The top rack is hotter and will cook food faster. 
10. Change the way you do laundry.
  • Do not use the medium setting on your washer. Wait until you have a full load of clothes, as the medium setting saves less than half of the water and energy used for a full load.
  • Avoid using high-temperature settings when clothes are not very soiled. Water that is 140° F uses far more energy than 103° F for the warm-water setting, but 140° F isn’t that much more effective for getting clothes clean.
  • Clean the lint trap every time before you use the dryer. Not only is excess lint a fire hazard, but it will prolong the amount of time required for your clothes to dry.
  • If possible, air-dry your clothes on lines and racks.
  • Spin-dry or wring clothes out before putting them into a dryer. 
Homeowners who take the initiative to make these changes usually discover that the energy savings are more than worth the effort. InterNACHI home inspectors can make this process much easier because they can perform a more comprehensive assessment of energy-savings potential than the average homeowner can.  


You can read similar articles online at www.echomeinspection.com/our-blog.html

Thursday, March 24, 2016

The Benefits Of Blogging

1) It helps drive traffic to your website.

Raise your hand if you want more website visitors. Yeah, me too.
Now think about the ways people find your website:
  • They could type your name right in to their browser, but that's an audience you already have. They know who you are, you're on their radar, and that doesn't help you get more traffic on top of what you're already getting.
  • You could pay for traffic by buying an email list (don't you dare!), blasting them, and hoping some people open and click through on the emails. But that's expensive and, you know, illegal.
  • You could pay for traffic by placing tons of paid ads, which isn't illegal, but still quite expensive. And the second you run out of money, your traffic stops coming, too.
So, how can you drive any traffic? In short: blogging, social media, and search engines. Here's how it works.
Think about how many pages there are on your website. Probably not a ton, right? And think about how often you update those pages. Probably not that often, right? (How often can you really update your About Us page, you know?)
Well, blogging helps solve both of those problems.
Every time you write a blog post, it's one more indexed page on your website, which means it's one more opportunity for you to show up in search engines and drive traffic to your website in organic search. We'll get into more of the benefits of blogging on your SEO a bit later, but it's also one more cue to Google and other search engines that your website is active and they should be checking in frequently to see what new content to surface.
Blogging also helps you get discovered via social media. Every time you write a blog post, you're creating content that people can share on social networks -- Twitter, LinkedIn, Facebook, Pinterest -- which helps expose your business to a new audience that may not know you yet.
Blog content also helps keep your social media presence going -- instead of asking your social media manager to come up with brand new original content for social media (or creating that content yourself), your blog can serve as that repository of content. You're strengthening your social reach with blog content and driving new website visitors to your blog via your social channels. Quite a symbiotic relationship, if I do say so myself.
So, the first benefit of blogging? It helps drive new traffic to your website and works closely with search engines and social media to do that.
blogging-inbound

2) It helps convert that traffic into leads.

Now that you have traffic coming to your website through your blog, you have an opportunity to convert that traffic into leads.
Just like every blog post you write is another indexed page, each post is a new opportunity to generate new leads. The way this works is really simple: Just add a lead-generating call-to-action to every blog post.
Often, these calls-to-action lead to things like free ebooks, free whitepapers, free fact sheets, free webinars, free trials ... basically, any content asset for which someone would be willing to exchange their information. To be super clear for anyone unfamiliar with how traffic-to-lead conversions work, it's as simple as this:
  • Visitor comes to website
  • Visitor sees call-to-action for a free offer
  • Visitor clicks call-to-action and gets to a landing page, which contains a form for them to fill in with their information
  • Visitor fills out form, submits information, and receives the free offer
If you scroll down in this blog post, you'll see a call-to-action button. In fact, 99.9% of the blog posts we publish have call-to-action buttons ... and yours should, too. That is how you turn that traffic coming to your blog into leads for your sales team.
blogging-inbound-image
Note: Not every reader of your blog will become a lead. That's okay. No one converts 100% of the people who read their blog into leads. Just get blogging, put calls-to-action on every blog post, set a visitor-to-lead conversion rate benchmark for yourself, and strive to improve that each month.

3) It helps establish authority.

The best business blogs answer common questions their leads and customers have. If you're consistently creating content that's helpful for your target customer, it'll help establish you as an authority in their eyes. This is a particularly handy tool for Sales and Service professionals.
Can you imagine the impact of sending an educational blog post you wrote to clear things up for a confused customer? Or how many more deals a salesperson could close if their leads discovered blog content written by their salesperson?
"Establishing authority" is a fluffy metric -- certainly not as concrete as traffic and leads, but it's pretty powerful stuff. And if you need to tie the impact of blogging to a less fluffy metric, consider measuring it the same way you measure sales enablement. Because at the end of the day, that's what many of your blog posts are. Think about the sales enablement opportunities blogging presents:
  • If prospects find answers to their common questions via blog posts written by people at your company, they're much more likely to come into the sales process trusting what you have to say because you've helped them in the past -- even before they were interested in purchasing anything from you.
  • Prospects that have been reading your blog posts will typically enter the sales process more educated on your place in the market, your industry, and what you have to offer. That makes for a far more productive sales conversation than one held between two relative strangers.
  • Salespeople who encounter specific questions that require in-depth explanation or a documented answer can pull from an archive of blog posts. Not only do these blog posts help move the sales process along more swiftly than if a sales rep had to create the assets from scratch, but the salesperson is further positioned as a helpful resource to their prospect.

4) It drives long-term results.

You know what would be cool? If any of the following things helped you drive site traffic and generate new leads:
  • Trip to Hawaii
  • Going to the gym
  • Sleeping
Good news, though! That's what blogging does -- largely through search engines. Here's what I mean:
Let's say you sit down for an hour and write and publish a blog post today. Let's say that blog post gets you 100 views and 10 leads. You get another 50 views and 5 leads tomorrow as a few more people find it on social media and some of your subscribers get caught up on their email and RSS. But after a couple days, most of the fanfare from that post dies down and you've netted 150 views and 15 leads.
It's not done.
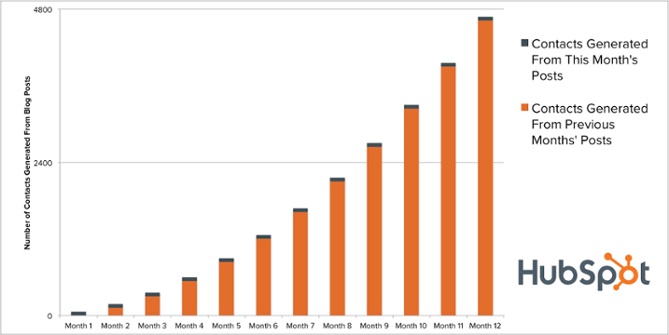
That blog post is now ranking in search engines. That means for days, weeks, months, and years to come, you can continue to get traffic and leads from that blog post. So while it may feel like day one or bust, in reality, blogging acts more like this:
blogging_compounding_returns-1-1
So while you're hitting your snooze alarm, surfing in Hawaii, and pumping iron, you're also driving traffic and leads. The effort you put in yesterday can turn into hundreds of thousands of views and leads in the future.
In fact, about 70% of the traffic each month on this very blog comes from posts that weren't published in the current month. They come from old posts. Same goes for the leads generated in a current month -- about 90% of the leads we generate every month come from blog posts that were published in previous months. Sometimes years ago.
We call these types of blog posts "compounding" posts. Not every blog post will fit into this category, but the more evergreen blog posts you write, the more likely it is that you'll land on one of those compounding blog posts. In our own research, we've found that about 1 in every 10 blog posts end up being compounding blog posts.
Screen_Shot_2015-09-22_at_11.57.42_AM
To me (and hopefully to you), this demonstrates the scalability of business blogging. While you might not see immediate results, over time, you'll be able to count on a predictable amount of traffic and leads for your business without any additional resource investment -- the work to generate that traffic and those leads is already done.

If you'd like to learn more about the long-term impact of blogging and how to reap even more benefits from the blog posts that are ranking in organic search for your business, check out this blog post, "The Blogging Tactic No One Is Talking About: Optimizing the Past".

Secondary Benefits of Business Blogging

There are other reasons businesses might want to blog, but I think they're smaller and stray from the core benefits of blogging.
For instance, I love to use our blog to test out big campaigns on the cheap -- before we invest a lot of money and time into their creation. I also love to use our blog to help understand our persona better. And while this shouldn't be their primary use, blogs also become great outlets through with marketers can communicate other PR-type important information -- things like product releases or event information. It's certainly easier to get attention for more company-focused initiatives if you've built up your own audience on your own property, as opposed to pitching your story to journalists and hoping one of them bites.
These are all great side effects or uses of a business blog, but they're secondary benefits to me.
If you're looking to start a business blog or get more investment for one you've already started, the reasons above are a great place to start arguing your case.


You can read similar articles online at www.echomeinspection.com/our-blog.html

How To Understand Branding

Branding is a critical part of any business' success; if you'd like to pursue a career in business, it's crucial to understand how branding works. 
From a shallow point of view, brand is what's given by a company to its merchandise so the manufacturer can be identified by consumers. Yet, after an increasing evolution on the production systems that allows almost any manufacturer to make high quality and satisfactory products, brands became a way of distinguishing simple commodities and their manufacturers by status, emotional characteristics and subjective qualities. A well-built brand gives the company or product personality, and evokes emotional and subliminal characteristics that are not necessarily found in the company or product themselves.
A brand is built, initially, considering the following main characteristics:
  1. The target public -- its preferences, interests and ways by which it might be attracted.
  2. The geographic place -- its particularities, culture, population, weather, history, etc.
  3. The selling place -- its consumers' habits, other merchandising available for sale and the nearby selling places.
  4. The market -- similar products and eventual gaps or saturations on the distribution, communication and manufacturing.
  5. Communication -- advertisement and other marketing actions, as well as brand building of similar products.

After a market analysis, the building is started, accomplishing how to do brandingthe following steps (not necessarily in the given order):
  1. Creation of a name by the company owner, its marketing department or an advertisement agency.
  2. Creation of a logo, considering its applications and future uses. It's usually done by an ad agency or a design company.
  3. Creation of a personality that encompasses all the characteristics the brand is supposed to have. It's done by the marketing department or an advertisement agency.
  4. Elaboration of marketing actions that will publicize the new brand and its values, in the best way to reach the desired market and public. The choice of the market actions depend on the budget available, the market size, its peculiarities, the public, etc.

After a deep marketing analysis and a study of the best values to be attributed to the product, the brand is launched as a pool of subjective characteristics that are not materially present in the merchandise. If a brand becomes too old or old-fashioned, or if it doesn't attracts the market or public it is supposed to, actions of repositioning can be done. These actions can evoke the brand a new personality or reach new markets and consumers, and can be done by communication and marketing actions as well as logo and package changing.
All those studies and hard work, when well done, result in much-valorized brands that have a trademark value even higher than all properties and stocks of the company itself. The most famous example of such brands is Coca-Cola.  Although you may not reach their level, you can definitely develop more effective branding for your company by taking some business marketing courses online.


You can read similar articles online at www.echomeinspection.com/our-blog.html

How To Keep Yourself Motivated

Often, when we get ourselves ready to do something, we are not happy to do it. No matter how hard we try, the task just seems difficult, boring or both. Here is how to get motivated.
  1. Decide why you want to do it. Nobody ever really does something because they "should." This is just our way of blaming some unknown external system for forcing us to do it. Find the honest reason for doing the task. Here are some examples:
    • To keep my job (raise your hand if this fits your case).
    • To keep my partner happy.
    • To enjoy one more success.
    • To be able to boast about it later.
    • ... and so on.
  2. Face your fears. The flip side, of course, is what is keeping you from doing the task at hand. Once again, it is easy to blame it on your lack of knowledge or the shortage of time or resources, but if you dig down deep, you may find these fears are what block you:
    • I am afraid of doing a less-than-perfect job.
    • I do not know enough and I am afraid to ask.
    • I am afraid of what comes after completion, which is my manager's feedback.
    • I am afraid to complete the task too quickly and I am not sure what to do next, but I do not want to be seen as wasting time.
    • ... and so on.
  3. Start doing something. Now that you are aware of your emotions, it is time to start moving. The nice thing about doing something is that your situation changes and with it, your point of view. Once you have begun, you will also be encouraged by your progress, and this will keep you moving even further. Try these first steps:
    • Look things up on the web.
    • Take a clean sheet of paper and simply write down the requirements in your own words.
    • Break the task down into smaller chunks.
    • Create a new document and type the headings into it.
    • Go to the nearest mirror, make sure nobody is watching you, and smile at yourself!
  4. Pick a reward. This is especially good if step 1 has not generated a very long list. Choose something fun you can do or something you can buy and decide to do or give it to yourself after you are done.


You can read similar articles online at www.echomeinspection.com/our-blog.html

How To Get Good Customer Service

Everyone likes to receive good customer service.  And we can all probably recall times that we received customer service that was extraordinary.  Here are a few tips to increase your odds of getting customer service that surpasses ordinary:

  1. You set the tone.  Your attitude sets the tone for the quality of the customer service you will receive.  When you are greeted with a grunt (or worse) from a surly teenager manning the counter, how do you respond? Yes, the kid needs to learn some respect but the odds that you may be able to impart that lesson by lecturing him?  Nil.  As any parent knows, the best teaching occurs by example.  Always treat others as you would like to be treated, especially when you are not being treated well. 
  2. Be clear about your expectations.  No one can read your mind. You need to communicate what you need and when so that the person serving you can deliver.  Whether this means that you need a meal quickly in time to drive to the airport or card stock delivered by a certain date, the person providing the service needs to have a clear understanding of your expectations.  Sometimes a customer can be so engrossed in a project that he forgets others do not have the same working knowledge of the project that he does; communicate your expectations in a clear and concise manner from the start. 

  3. Don't take mistakes personally.  Mistakes happen.  You'll order your fried rice without tomatoes or your pizza crust extra crispy, and the server will mess up your order.  Don't sweat the small stuff.  Even if a waiter spills hot coffee on your brand new Armani suit, it is not because he doesn't like the suit......it's because he tripped.  Unpleasant things occur not because your server does not respect you or wasn't listening or has other bad qualities........but because we're all slouching towards Bethlehem one soggy pizza crust at a time. 

  4. Speak up if something goes wrong.  If things are not going as you expected, let the appropriate person know.  Sometimes people wait too long to address a problem so that by the time they finally do say something, they have built up a degree of anger that is inappropriate to the offense.  That's when you'll end up seeming like a jerk for a complaint that (at one point in time, anyway) was legitimate.
  5. It takes two to tango.  A server may well attempt to push your buttons; don't let him. Go over this head, not to try to get him into trouble, but to get what you want.  Somewhere within the organization is an individual who recognizes the importance of quality customer service and who will be able to meet your needs; locate him and express your concerns to him in a levelheaded fashion.  This course of action is far preferable to getting into a pissing match with a disgruntled employee who might even enjoy displeasing you.

  6. Never lose your temper or your patience.  No one likes to give good service to someone who is condescending, rude, impatient or just downright mean.  Even if this type of behavior helps you to get your way in the moment, it works against you in the long run.
  7. Treat your server as an equal.  Look him in the eye.  Speak to him, not at him.  If you are on a cell phone call, finish the call before expecting to receive help.  Hand your money to the server instead of placing it on the counter.  Ask your server's name-he has one!-and remember it.  Use words like "please" and "thank you."  Be genuine, personable and polite.  Treat your server as you would like to be treated if you held his position and you will be amazed at the kind of service you receive.
  8. Treat other customers as equals.  Don't cut in line.  Wait your turn patiently.  Don't give your opinion unless asked.  Remember that annoyed customers become the server's problem, too, so do your best to maintain friendly relations with everyone in the immediate vicinity, even if the service is slow, the waiting room is 90 degrees, and you really have to go to the bathroom.  C'est la vie. 
  9. Tip well and tip often.  If you've ever worked in a service job, you know just how much tipping matters.  But if you haven't, take my word for it.  Customer service jobs are not easy, nor do they tend to be all that lucrative.  By treating people with respect and dignity, you are already a step ahead.  If you've been tipping the maitre d' regularly, that table by the window is yours.

Good manners get you not only good customer service but many of the other goodies to be had in this life.  To receive good customer service, you must apply your emotional intelligence within the marketplace.  Do so and you'll receive quality customer service almost every time.


You can read similar articles online at www.echomeinspection.com/our-blog.html

How To Become An Entrepreneur

Learn how you can start living successfully as an entrepreneur. Start by taking online courses in business management. Before you start your journey, let's first define the word and examine some of the characteristics of an entrepreneur in today's world. The definition of "entrepreneur" is a person who organizes, operates, and assumes the risk for a business venture.
What are some of the typical characteristics that make up an entrepreneur in today’s world?
Entrepreneurs:
  • Have passion for what they do in life.
  • Express a great amount of enthusiasm in their line of work.
  • Are goal-oriented in their quest to reach their desired outcomes.
  • Have a creative imagination when it comes to their ideas in business.
  • Have a positive attitude when it comes to building their business and business relationships.
  • Are very quick decision-makers in their business endeavors and ideas.

These are some of the amazing characteristics of an entrepreneur.
An entrepreneur chooses not to sit back and take what life deals him; he attacks life head on, takes charge of his own life, and has a persistent determination to create his own path in life. In a book called “Think and Grow Rich” by Napoleon Hill, Mr. Hill said that “an educated person is not necessarily a person with any specialized knowledge, but an educated person is one who has so developed the higher faculties of their mind that they can acquire anything they want without violating the rights of others.” Do you know what the higher faculties of your mind are? The higher faculties of your mind are perception, reason, memory, will, intuition and imagination. Many wealthy entrepreneurs today understand these higher faculties; you are going to be introduced to a couple of these higher faculties in the following steps.
After applying the steps below, you will have a good understanding of the entrepreneur personality test. This is a test for you to discover the mindset you have now, compared to the new entrepreneurial mindset that you will be creating. Also, your new mindset will help you to understand the importance of a network of business opportunities. It is important for you to start networking with other like-minded individuals to help assist you in accomplishing your business goals. Most of the wealthy entrepreneurs today are living successfully due to the many benefits of having a small business while being home-based in the state they live in. So let’s go into the key steps of what it takes to become a successful entrepreneur. Here are some skills that you can work at developing as you learn.
  1. Create your new entrepreneurial mindset. Before you can become successful, you have to create a new mindset to achieve the things you want in your life. Examine your current mindset, and how that way of thinking has gotten you to where you're at right now. Be honest with yourself when looking over your current results, because this will give you an accurate measure of the choices that you have made over the years. Only then will you begin to see for yourself that it is time for you to work on your new mindset in order to start living the life you want to experience, regardless of your current circumstances. Once your new mindset is in motion, you will start making very creative choices to move you faster to your desired goals. Find three to four successful entrepreneurs that have the lifestyle that you want, and ask them if you can interview them individually to understand the reasons why they are so successful at what they do in their current business. While you are listening to them, take notes, examine what they say to you about themselves and their success, and grasp what type of mindset they have now in their lives. This will propel your own success in so many different ways because you will be able to apply what you have learned.

  2. Apply personal development in your daily life starting today. For example, read good self-help books like the one mentioned at the end of this article. Listen to self-improvement tapes, CDs, and as an extra bonus, attend a least one personal development seminar a year to help grow, maintain and keep your new mindset growing every day. Your level of awareness will increase greatly with the new mindset that you are creating to go after the things you want in your life. Having an open mind as an entrepreneur will also help you make better decisions quickly, and become more creative.
  3. Get out three blank sheets of white paper and a pen or pencil. You are going to write down your new mindset as an entrepreneur on your sheets of paper. Writing down what you want (and what you are going to achieve) is a very powerful activity that you are making a habit of now. Taking out your sheets of paper right now is a serious gesture that you are making to let your subconscious mind know you are a person of action. This step will help propel you on your new journey, the journey of taking the necessary steps needed to achieve your desired goals. These three blank sheets of paper represent your future. As an entrepreneur with a new mindset you can paint any picture you want to on the three sheets of paper, regardless of your current circumstances.
  4. Write down all of your new ideas as an entrepreneur on the first sheet of paper. Label the first blank sheet of paper you have as number one. You have been spending some time changing the way you think, and creating a new mindset: Start writing down all of the new ideas that you have as an entrepreneur now. The ideas that you are writing down now are the ones that you have been thinking about that you want to create and achieve in your physical presence now. For example, if you have a burning desire in your heart to start your own daycare center, restaurant, hotel, or create a product for people to buy, then write down all of your ideas in every detail. Write down how big the daycare center is going to be, where it is going to be located, what color the building is going to be, how many children you will allow to be kept in your daycare, how many people you will staff, what type of services you will provide to the parents and children coming to the daycare. This is a perfect example of how you can start writing down all of your ideas as an entrepreneur on the sheet of paper now.
  5. Write your short-, middle- and long-term goals down on the second sheet of paper. A short-term goal is something you want to achieve in one day, one week or one month. A middle-term goal is something you want to achieve in ninety days to six months. A long-term goal is something you want to achieve in one year or more. Write down what you want to achieve on the second blank sheet of paper. List them in the categories stated above as short-, middle- and long-term goals. At the top of the paper, you can have your short-term goals, in the middle section of the paper, you can have your middle-term goals, and at the bottom of the paper you can have your long-term goals (if necessary use the back side of the sheet of paper). Be creative when writing down your goals because this is your life that you will be experiencing in the near future. This is one of the biggest reasons why 1% of our population is earning around 96% of all the money that’s being earned in our world today. They set goals, and they keep at them until they have seen them through into their physical manifestation.  
  1. Write down fifty things you want to experience in your life now on the third sheet of paper. You can start really having some fun in this step by writing down fifty things that you want right now regardless of your current bank account, job, business or relationships in your life now. Those fifty things that you write down will help you to understand that you can have whatever you want in your life as an entrepreneur. However, you have to first know what you want in detail. For example, you might want a brand new house in the city that you are currently living in. If you write down that you want a brand new house, however, that is not what you really want, and it is not in enough detail for you to realize that you can have what you want now. If you write down that you want a brand new two-story house that has five bedrooms, and four bathrooms with a whirlpool Jacuzzi in the master bedroom upstairs, and brown hardwood floors all throughout the downstairs of the house, now you are really writing about wanting that house! You can see it clearly in your mind, and you will surely take the necessary actions when the time comes to buy that home (without violating the rights of others in achieving your goal). This will surely move you in the direction of taking the steps necessary to meet your goals. Many wealthy entrepreneurs get what they want every time because they write it down on paper first; then, they go after it in their daily life.
  2. Proud owner of a cafeIntegrate personal development into your daily lifestyle. Start applying personal development everyday in your daily life. With the new mindset you have now, you should continue to feed your mind everyday with personal development. For instance, you can take out three minutes in a day and meditate on goals or just clear your mind of everything for the moment. Read a good book on personal growth, listen to meditation music, have a conversation with a positive person and people or obtain a personal development program to help keep your mind on track in accomplishing your goals. The meaning of personal development can be found in the term "self-help," which means any practice whereby an individual or a group attempts self-guided improvement—economically, intellectually or emotionally. So you see this is some great stuff to add as a part of your daily life and it will certainly help move you in the right direction. Successful entrepreneurs apply personal development in their daily lives everyday. They work ninety percent on themselves, and ten percent on their businesses. So with that in mind, personal development is a must to achieve success as an entrepreneur.
  3. Give yourself a command and follow it. Now that you have been thinking and writing about your goals, the things you want, and your ideas as an entrepreneur, give yourself a command on what you want to achieve first, and follow it until you see it through to the finish. Then you can move on to something else that you want to focus on and achieve. You will continue the same process over and over--whatever you decide you want to achieve, give yourself a command and follow it until it is achieved. This is part of achieving entrepreneur success. Keep your new mindset positive by hanging around like-minded individuals. Hang around more like-minded individuals daily, monthly and yearly to keep a positive mindset. Hanging around individuals that have the same entrepreneurial concepts that you do will keep your mindset in a positive state, and on the right track to achieve your goals. You can hang around like-minded individuals by either listening to a group of individuals on the phone via conference calls, attending seminars, being part of an online forum of positive people like yourself, and keeping in contact with the positive like-minded people you have formed a relationship with on your journey in achieving your goals. The more of these people you associate with regularly, the more it will certainly keep moving you in the direction of becoming successful as an entrepreneur.
  4. Take seven minutes out of every day to visualize the end result of your goal in your mind. Take seven minutes out of your day to visualize the end result of your goal that you have decided to achieve within a specific time frame (as mentioned in step number three). For example, if you decided to own your own daycare center, then you could spend seven minutes in the day visualizing about every aspect of your daycare center as if you currently owned it in the present moment. You can also start off visualizing everything that you wrote about the daycare center in step number three. Then you can work your way to the end result of having the daycare center in your possession now. For instance, visualize the amounts of checks that you are receiving from your customers now that you have the daycare center, the different cars parked at your daycare center parking lot, the joint ventures that you have created with other daycare center owners in your area in providing better services in your city. Before successful entrepreneurs became successful, they first visualized the end result of their goal, and continued to dwell on that end result a few minutes of every day until it became a part of their experience in life.
  5. Put four positive affirmation statements on a sticky note around your home, office, and work area in times when you need to be encouraged as you move forward with your new idea. Affirmations should always be written as positive statements in the present tense. Placing four affirmation statements on a sticky note around an area that you visit most often will further your actions toward your goal because your affirmations will began to work as supportive thoughts, and a placeholder for a more positive mindset in your daily life. Your affirmation statements should always be written in present tense such as, "I own a daycare center in Chicago, Illinois," or you can write, "I am a daycare center owner in Chicago, Illinois." Keep your affirmation statements short, positive, and to the point of what it is that you want to see manifested as an entrepreneur in your life now. You will definitely be putting yourself in the 1% bracket of our population that gets everything they want out of life.


You can read similar articles online at www.echomeinspection.com/our-blog.html

Friday, March 18, 2016

5 Tips To Fix Stuff Your Kids Mess Up

We've all been there or will be one day, your kid has destroyed something by accident or just because they're evil.  You turn to your friends, family and even google or Pinterest for advice.  With suggestions from some of the mommy friends.  Here is a list of to help out.


1.  Crayon On Wall

I think this happens to everyone's walls at some time.  Trusty Mr. Clean Magic Eraser always works.

2.  Toilet Problems

I'm talking about when you find little Johnny in the bathroom, you just heard it flush and he has a guilty look on his face.   A toilet auger works wonders and can be found at Home Depot.

3.  Clean Stuffed Animals

I've always thrown them in the washing machine.

4.  Nail Polish

Do you have sugar?  Yup dump some sugar on wet nail polish to absorb.

5.  Car Upholstery

Unless you throw down a trap when your kids get in the car, you are going to have a mess no matter what age they are.  Create a DIY cleaner with Dawn, vinegar and club soda.

You can read similar articles only at www.echomeinspection.com/our-blog.html

How To Create A Raised Garden Bed with $15

I wanted a cedar raised garden bed in a problem area of my backyard but all the ones I could buy were upwards of $100! Since that wasn't in my budget I scoured the Internet for other options.  With a genius idea from Ana white I was able to build my own for under $15! It was a thirty minute project, no crazy construction skills required, just a drill and a circular saw.  

To make the bed I bought a total of 6 cedar fence slats for under $3 each.  I started by cutting two of them in half to create the end boards.  I used 1.5" wood screws to attach the boards to scrap 2x4's I had on hand to brace the corners.  It seriously took me about 35 minutes to make one.  I was so excited such an instant gratification.

When I had it all built I removed the weeds underneath and turned the dirt over as deep as I could.  Then I filled it with 6 40lb bags of 99 cent topsoil and 2 large bags of miracle grow garden soil.  

I am really excited about what I planted, my intent is also a salsa garden so I put in two tomatoes, jalapeƱo, bell pepper, 4 cilantro plants and then I also added a banana pepper, zucchini, lavender.  


You can read similar articles online at www.echomeinspection.com/our-blog.html